Newsletter Page
- Click the “Newsletter” tab on your navigation bar.
- Click the “New Post” button
- Enter Post Title (i.e. October 1st Newsletter)
- You have two options for adding content:
(all steps are the same as doing the Schedule this way EXCEPT #6)
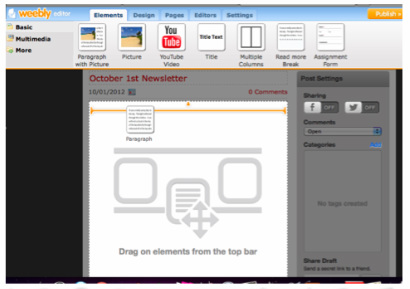
1. Drag and Drop the Paragraph with Picture onto the area where is says “This page is empty. Drag elements here.”
1. Drag and Drop the Paragraph with Picture onto the area where is says “This page is empty. Drag elements here.”
2. Click to edit the section you want to change
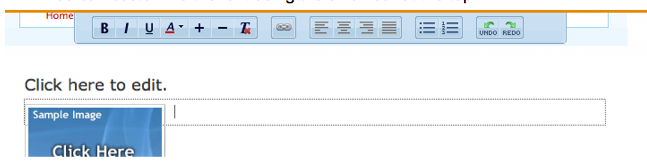
3. You can either copy and paste your text onto the page or type directly into the box.
4. If you want to add pictures, you can drag and drop the picture icon from the top bar to where you want it in your post (either above or below the text)
5. Click the picture where it says “Click here to edit”You can either upload a picture from your computer or search for one. If you are using a picture from your computer, you can either “drag and drop” it from the location on your computer to the box or go to “Upload a photo from your computer”. Select the picture you want and click open. You can change picture settings. For more information, click here.
6. When you are done with your newsletter, click “Publish Live” (you can also save it and come back to it later. The “draft” won’t be visible to others until you publish it)

If you get this screen:

Click the “x” at the top (they are trying to get you to buy your domain name). Your newsletter is still posted on your website.
***If you create your file in Pages, you will want to change it to a PDF. For information on how to do this, click here (also has information on how to make a Word Document into a PDF)****
- Click on the “Multimedia” tab at the top left side of your screen

2. Drag and Drop the “File” icon onto the part of your screen that says “Drag Elements from the Top Bar”
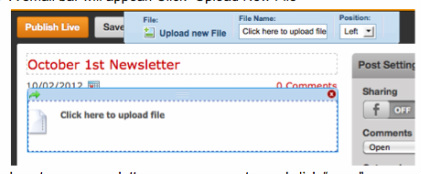
3. Click “Click Here to Upload”
4. A small bar will appear. Click “Upload New File”
3. Click “Click Here to Upload”
4. A small bar will appear. Click “Upload New File”
7. Choose the file from your computer and select “open”
8. It will appear on your screen like this:
8. It will appear on your screen like this:

9. When you are done with your newsletter, click “Publish Live” (you can also save it and come back to it later. The “draft” won’t be visible to others until you publish it)

If you get this screen:
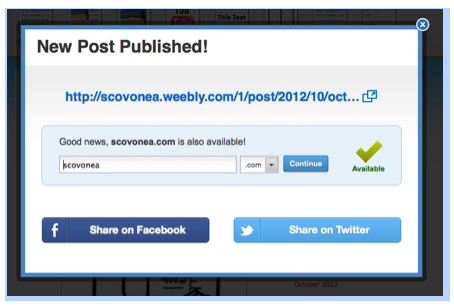
Click the “x” at the top (they are trying to get you to buy your domain name). Your newsletter is still posted on your website.
